Amazon Promotions

Showing posts with label breakfast. Show all posts

Tuesday, December 23, 2014

Sourdough Discard Pancakes

I have been trying out the sourdough breads and hence have been discarding a lot of my levain which seriously have been a source of pain for me to see what could have been food to go to waste.  However, having to make two things - both the bread and another recipe for the discard is a little too overwhelming for me and my schedule.  (Oh if you are wondering why I don't have a post on my levain bread yet, this is because I have yet to find one I am entirely satisfied.)

Yesterday I have been trying out another recipe which the bulk fermentation will take a day and proofing over night and today is no work day.  This allows me to trial a recipe for the discard.

Surfed the internet and found many interesting ideas for discards but I want to start with something familiar and quick and easy.  Found this recipe at a few websites and decided to try and yes, it is good!  So sharing it here.  My family had it with maple syrup and butter, though my girl kept complaining that she wished we had bought fruits (because we always have our pancakes with berries, bananas and kiwi).  But sorry I didn't stock any in my fridge today.

I have made amendments to the recipe so that it suits my habits of measuring and I only had about 150 g of discard from yesterday.  So this is how it goes :)

Sourdough Discard Pancakes

My first trial at pancakes made from levain discard

Ingredients

  • 200 g all-purpose plain flour
  • 1 Tbsp sugar (I use organic sugar at home)
  • 1/4 (sea) salt
  • 1Tbsp baking powder
  • 200 ml of milk
  • 3 eggs
  • 150 g levain  (discard)
  • 50 g melted (unsalted) butter 

Method:

1.  Sift all the dry ingredients in a bowl.
2.  In a separate bowl, whisk together the milk and eggs.  Add in the levain and mix well.  Let the mixture stand for 10 min.  (I usually use this time to start a little wash up because I don't like my sinks filled with dishes etc that stack high, that puts me off from washing.)
3.  Mix in the wet ingredients from 2 into the dry ingredients from 1.  I don't dump in everything.  I stir and mix in part by part.
4.  Finally incorporate in the melted butter into the pancake batter.
5.  Heat the pan or griddle and brush with a little oil
6.  Cook the pancakes in the pan.

Other Notes:

  • I found a nice trick in cooking pancakes many years ago.  Don't flip the pancakes too often.  Use a ladle and scoop the appropriate batter and just pour in the batter into the pan.  Let the batter cook till small bubbles appear on the surface and the sides start to firm up, then you flip it over to cook the other side.  Don't push and press down on the pancake.  As the underside now cook, you can see the pancake puff up in the centre.  Then remove the pancake off the pan, when the underside slightly browns.

Wednesday, July 2, 2014

Shinya Shokudo : Canned Maguro Rice (Tuna Rice) - Season 2 Episode 15

Shinya Shokudo : Canned Maguro Rice (Tuna Rice) - Season 2 Episode 15

深夜食堂 2 (第15 话) - 鲔鱼 (金枪鱼)美奶滋盖饭

Maguro Rice - Inspired by the series Shinya Shokudo

When you become a mummy, the food that you cook tend to revolve around what is good for the kids and what the kids will tend to eat and it is really difficult to try new recipes when they are picky eaters.  My girl does not like sweet stuff and rejects cakes and biscuits.  My boy tends to be suspicious of new food and would like to stick to the traditional stuff.  Once in a while, you must really starve them to introduce new food.  Used to be able try new stuff during lunch and that too stopped as I now make packed lunch for my husband when I am free and that means catering to his taste as well.

Anyway I watched the Japanese series "Shinya Shokudo" last school holiday and have been meaning to try out new recipes and I finally got a chance since I was on medical leave yesterday and that meant I would stay at home and try something simple.  I did butter rice in the morning, and finally managed to try out the canned maguro don.  It is really simple and nice and taste like a modified and improved version of  the traditional tuna mayo filling that I make for my sandwiches, except, this time the filling is topped on rice. I served mine with miso soup and I really liked it.

The recipe below makes actually 3 servings....so you can make and use the left over for sandwiches later.  I refrigerated mine in an airtight container and it will be my lunch today as well.  By the way, the recipe is quite versatile, adjust according to taste.  If you like more of a spiced up version, a little more wasabi would be good.  Potentially, these could be for my kids so I reduced the wasabi.


Recipe : Canned Maguro Rice (Tuna Rice)

 Servings: 2-3 

Ingredients:
 
  •  1 can of tuna -  I used tuna chunks in water so that I can salt according to taste.  You can use brined tuna or tuna in oil.
  •  2 tbsp of mayonnaise
  • 1/2 tsp wasabi  ( You can add more if you like a little more spice.  We can't get fresh wasabi in Singapore, but if you could I think it would taste better.)

  • 1/2 tsp of miso
  • 1 small yellow onion
  • Salt to taste.
  • 1 sprig of spring onion ( also known as scallions) - You may use chives but it makes it more English I guess.
  • Cooked japanese white rice (warm)
 
Method:
1. Shred the spring onion parallel to its fibres and soak in chilled water.  It will cause the spring onion to curl up and makes it pretty for garnish.  
(In the original TV series, I think seaweed was used, but I am having my rice with wakame miso soup so I decided to substitute with spring onion.  For the Japanese, I think it is important that their food looks good - served with the correct utensils, having the right colour and I do agree it whets the appetite.)

 
2.  Dice the onions finely and set aside.
3.  Drain the canned tuna and place in a mixing bowl. Add in the mayonnaise and wasabi and mix well with a fork. 
4. Add in the chopped onion and mix well as well.  Taste and add salt if necessary. 
5. Scoop warm japanese cooked rice in a bowl.  Place some mixed maguro (tuna) and top with the prepared spring onion.
You may serve with miso soup to complete the meal.

Notes:

For mayonnaise, I tend to like to go for the Japanese mayonnaise and the brand by Ajinomoto....it's more for the ingredients....I tend to read the ingredients in detail and the one I get contains eggs, vinegar, salt and sugar - I see less weird chemical names that I don't recognise.

I also think that the rice will taste good if it has a sprinkling of toasted sesame...it gives it a more complex texture and it ups the calcium content at the same time. :)


Sunday, September 26, 2010

Homemade Kaya

My mother always made tonnes and tonnes of Kaya to give away to my godmother, my neighbours and her friends when I was younger.  And I do miss her kaya once in a while.  With kaya easily available at all bakery shops and supermarkets.  It seems no sense to make my own kaya.  What is however interesting to note is that when one turns and look at the ingredients list at the side of the bottles, one will find many preservatives on the list of ingredients.  The thickened kaya sold at supermarkets may also contain ingredients like modified starch.
The key problem with home-made kaya is therefore, given no preservative, often do not keep more than two weeks in the fridge.  I made a large batch a few years ago and as it was too much (and also too crazy) to finish it all within two weeks,  I actually stopped.  However, I do have a craving for homemade kaya again recently so decided to make it again.  It wasn't this bad this time round, as I halved the original recipe and also gave half to my mother-in-law which made her very happy.  Below are the ingredients and method for my recipe.

Ingredients:

1 bunch of pandan leaves (about 6- 8 leaves).  (separate into individual leaves.  For each leaf, further tie lenghwise into 3-4 strips.  Then tie the bundle into a knot.)

200 ml coconut milk (You may use the ready packets found in the supermarket)

200 g of sugar (You can use brown sugar, or even substitute with 1/2 -1/3 brown, black or "orange" sugar.  I used organic raw sugar for mine.  It is very versatile.  You can adjust sweeter or less according to taste as well.)

5 large eggs

Method:

 Strain the coconut milk over the top pot of a double boiler.

Add the sugar and eggs into the pot as well.
 Whisk well till the eggs, coconut milk and sugar are well-combined and the sugar has dissolved.
 Once mixed, put in the knot of pandan leaves. Place the mixture over bottom of a double boiler which is boiling.  Lower the flame till middle, till the water just boils with smaller bubbles.

 Continue whisking the top pot till the mixture turns into a thick custard, remove the pandanus leave.  The mixture may be a little lumpy, if you like it smoother, you can blend the mixture with an electric hand-held blender.
Fill into bottles that has been washed and preboiled in hot water the cooled down.  You should consume all the kaya within 2 weeks.

Tuesday, September 7, 2010

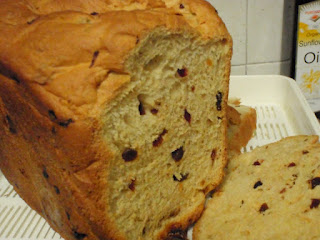
Homemade Mixed Fruit Bread

I have had my bread maker for many years and in fact it is older than my son, Daniel, who is nine this year.  However, although I had enthusiastically used it in the initial years and also during the period of my chemotherapy.  Work and family caught up with me and eventually it went into storage.

Recently I have been a little suspicious of the mass produced bread after my son did his mould experiment for his Science project.  The bread at the supermarket lasted more than a week before it moulded while the one from the traditional bread shop lasted only about 3 to 4 days.  I also had a further motivation when I found that the price of bread is steadily increasing over this one year.  So I decided to take out the bread machine and start making my own bread again, not for the savings - cause if you use good ingredients, you may still end up spending more. But for the sake that I know exactly what goes into the bread.

Below is one of my recipes which I adapted from a few recipes after experimenting sometime, it differs from the ones that come with my machine as it calls for the yeast to be activated with the liquid before the rest of the ingredients gets added in.  I was a little apprehensive but I realised this yielded bread that was fluffier.  I also use dried organic fruits that are meant as snacks rather than those bought at bakery sections as those at the bakery sections looks suspiciously laden with sugar and colouring.


Ingredients:

1 cup of milk
2 tbsp of sugar
2 1/4 tsp of instant dry yeast
1/4 cup of melted butter
3 cups of bread flour
1 tsp of sea salt
1/2 cup of mixed fruit ( I use cranberries, raisins, chopped apricot - organic and non-sulphured)

Method:

Put the blade of the breadmaker into the baking tin.
Warm the milk in a saucepan or a microwave till it is about 40 degrees Celsius.  I usually just warm it till it is above my body temperature, I test it by dipping my finger in, it feels warmer than me and yet I can still dip my finger in.  (It is like testing for fever).  Dissolve the sugar and yeast and wait for 10 min.  If the yeast is still active, it should bubble and foam. (You can do this in the tin or alternative in another bowl and wait for it to foam before pouring into the tin.)  Once it starts to foam, you may add in the melted butter.


Combine the salt and flour and sift well. Tip in the flour mixture to the baking pan of the bread machine.


I usually add in the dried fruit on top of the flour mixture, as I usually do this before dinner, and do not want to check on the bread machine till later.

On the bread maker and set the setting to regular plain and start the cycle.


When the bread is ready (about 3 hours on my machine), remove it immediately from the baking tin and wait for it to cool before keeping and slicing it. 


Extra notes:

This is a basic recipe that is easy to vary.  And yes, it is that simple and I was just plain lazy.
For variations, you can replace milk with water, bread flour can be replaced by half with whole wheat flour.  If you don't like the fruits, you can omit them, I put them in to increase the fruit intake of my kids.  You can put in chopped nuts as well, no problem.  And butter can be replaced with sunflower oil....I do that when I run out of butter, though I like butter fragrance.

Sunday, August 29, 2010

Cheong Fan with a Japanese Twist (日式肠粉)

The favourite breakfast for my daughter, Danielle, must the Chee Cheong Fun (Steamed Rice Roll).  The Chee Cheong Fun must have originated from the Cantonese, as one can surely find them in any restaurants or shops selling Dim Sum (点心).

The cheong fun served in Singapore at the normal shops that sells breakfast are usually simpler in style than those served in the dim sum restaurants (which contains stuffings of shrimp or char siew - a sweet roast pork).  These cheong fun are usually steamed and cut into pieces, drizzled with a little fried shallot oil and sweet sauce (and chilli sauce if required) and sprinkled with sesame seeds.  When I was younger, each rice roll was only 30 cents and I would only need about amost 1 1/2 to fill my stomach (my elder brother would always be glad to finish the rest for me).  But the price has slowly crept up over the years, and how each roll can cost as much as $1.00 at some shops.

I have since stop buying from these shops mainly because of two reasons:
(1)  rice rolls are easily available at most of the beancurd stalls at wet markets from $2.20 to $2.60 for a packet of 10 rolls.
(2)  My daughter and son actually do not like sweet sauce, so they usually have their cheong fun with a drizzle of sesame oil and light soya sauce.
So I usually prefer to buy my own and steam it in the morning for them as breakfast. 

Recently, I found that I had a bottle of Japanese Goma sauce (sesame dip) which I left over from my last steamboat meal.  (I like to dip it with sliced beef).  Somehow, I decided to add it my cheong fun....and boy did I really like it.  My kids still like theirs plain and cannot appreciate the Goma sauce, but my husband loves it as well.  You should really try it the next time you have your cheong fun. 


Recipe:

Mizkan Dipping Sauce For Shabu-Shabu Sesame Flavor - Goma Shabu , Net Wt 8.4 Fl Oz (1 Bottle)1 bottle of Goma Sauce

Light soya sauce

Sesame oil

2 rolls of rice rolls (cheong fun) - This is for each person.  This can be bought at most beancurd stalls.  For those living abroad, they are readily available at stalls carrying Asian or Vietnamese food.

Sesame seed (toasted in a frying pan till fragrant but not charred)

Method:

1.  Steam the rice rolls over a wok of water for about 10 min to warm it up.

2.  Transfer the rice rolls to a serving plate.  Cut the rice rolls with a scissors into bite size length or quarters.  (I like mine quartered, my daughter likes hers bitesize.)

3.  Drizzle sesame oil over.  Then drizzle light soya sauce to taste.  Finally drizzle in the Goma Sauce over.

4.  Sprinkle with the toasted sesame seed.  (As much as you like!)  And it is ready for serving.


This is especially an easy breakfast, I usually steam the rice rolls while brushing my teeth and assemble them after that.


Friday, July 2, 2010

Life is So much Better with My Saeco Coffee Machine

  I was not a coffee drinker till I hit about 16 years of age.  However, I did not quite like coffee as I found that I would have an extremely bloated feeling and would be nauseous after drinking coffee.  So I still stuck on to the good old tea.

  However, starting work, getting married and after having children, I found myself keeping more and more late nights and tea was no longer strong enough and I switched to coffee though I only took it (like taking medication) only when I was absolutely necessary.

  The real turning point was when I visited my brother-in-law in Australia.  My husband was brewing coffee on the expresso machine everyday - that really hooked me on to coffee.  In fact, for that trip, we went back to Singapore with an expresso machine from Sunbeam.  After we came back, I enjoyed the experience of drinking coffee from the expresso machine, though we didn't do it daily as there was too much washing up to do and the normal electric coffee machine (drip models) was still more convenient. (And I found out what was wrong, I just simply could not take instant coffee or 3-in-1.  Taking brewed coffee did not give me any nausea feeling.)

  Last year (in June) while shopping, we saw that the whole range of Saeco fully automated expresso machine was on sale at SGD$700+.  After much discussion, we decided to buy it. I definitely did not regret the decision.  It is now so convenient to make coffee in the morning and at a fraction of the price at even the coffee from the coffee shop.  All I do now every morning, after waking up, is to just go to the coffee machine, warm it up and then press twice on the cup button (once, we found the setting both my husband and I like, we never changed it.), then hop into the bathroom brush my teeth and wash my face.  The coffee would then be ready and for me to add in milk for drinking.  The crema of the coffee is always great - I guess also because of the coffee

  There is a milk frother that comes with the machine, but I hardly use that on weekdays as I am always in a rush in the morning and do want to spend time cleaning it.  My son loves it though, he will get daddy to froth the milk on weekends to make his favourite hot "dinosaur milo" (a local hot chocolate with heaps of powdered malt chocolate).

  Maintenance is relatively easily and the machine will insist that you maintain it.  (The delivery man was also very professional, teaching us step-by-step, how to maintain the machine, brew coffee, make cappucino etc.)

  The size is just right for the two of us, though you need to empty the "waste bin" and top up the water quite frequently, which we don't really mind.   I really cannot imagine my life without my Saeco Machine now.

Monday, June 28, 2010

How to Cook Traditional Sweet Potato Teochew Porridge


  My son is down with flu.  At times like these, he has very little appetite and would only want something simple and not too oily for him to stomach.  So he decided he wanted to have some Teochew porridge.

  Teochew porridge is a simple dish which you can have a variety of side dishes to accompany.  This is a relatively simple dish to cook and is one of my staples for lunch when I was younger.  It is such a staple for many in the older generation that my father-in-law still has it for breakfast every morning with a lightly steamed fish or some pickled vegetables.

  Teochew porridge is different from the Cantonese congee, as the grain are still suppose to be very distinctive when cooked. When I was younger, I would simply have it with a little bit of light soya sauce (shoyu), a small piece of fermented beancurd or when times allowed a small piece of fried salted fish...and that to me is bliss....it always warms my heart after having a bowl of the porridge. 
 
This porridge can be found at most stalls at the hawkers or coffee shops in Singapore selling economical rice, though theirs do not come with sweet potatoes.  For shops that specialise in Teochew porridge, the price is always quite expensive, coming up to about $10++ for a meal for two with only about 3 side dishes, so I usually do not patronise those stalls as I find that I can easily whip up a meal on my own.

Traditional Sweet Potato Teochew Porridge

Serving : 2 - 3 people
Preparation time : 20 min (for brown rice it may take an additional 10 min)

Ingredients :
  • 1 cup of long-grained jasmine white rice ( you can use brown rice here as well, the cooking time is only a little longer)
  • water
  • 1 -2 sweet potato (depending on how much you can finish)
Procedure:

 Step 1  
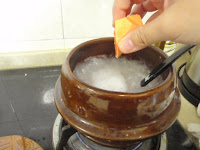
Put the rice into a pot of sufficient size.  The pot should be sufficient large so that that uncooked rice only takes up about 1/3 the size of the pot.  I like to use claypot here,  as I find the flavour of the sweet potatoes can infuse into the porridge better.  But you can use any pot of sufficient size.


Step 2  
Wash the rice about 2 to 3 times, to remove any impurities from the rice.  The water should still be murky (like milk diluted many times) when the rice is washed.


 Step 3                                                                                       Add water till the pot is approximately 2/3 full.  Do not fill to the brim else the water will bubble over when boiled.


Step 4
Put the pot over a stove over a large flame.  Cover with a lid leaving a small gap and let it boil, you will need to stir once or twice during the boiling to losen any grains that may get stucked at the bottom, else those grains will char.


Step 5
Peel the sweet potato(es) with a potato peeler and but into bite size.  Note that the size will get smaller the sides will break off and infuse in the porridge when cooked.  You can use any variety of sweet potato here.  My favourites are the orange-fleshed ones (usually from Australia) and the Japanese sweet potatoes.  If you can get organic ones, You can just scrub the sweet potatoes and cook it with the skin on and eat it.  It is suppose to be more nutritious.


Step 6

I soak the sweet potatoes in water while waiting for the porridge to boil so that they do not discolour.


Step 7

When the porridge boils, you will need to remove the lid.


Step 8

Add in the sweet potato at this junction.  And wait for the mixture to boil again.  When it boils, lower the flame till the mixture just boils but not over the pot.


Step 9

Continue cooking till the grains are cooked through, (that happens when the grain is of uniform colouration) and the grains start to fluff and split.  (In Chinese, we say that the grains just "opened").   Off the flame at this junction.


 Step 10

Put back the lid, and let the grains cotinue to cook in its own heat while you prepare the side dishes.

When you are ready, you can serve the porridge with its side dishes.


Dishes that can goes well with Teochew Porridge:

  • Fried Luncheon Meat Cubes (my kids favourite, though not entirely healthy, but I occasionally indulge them.

  • Sliced Steamed Squid with Orange Sauce Dip

  • Pickled Vegetables


  • Onion Omelette

Sunday, June 27, 2010

Singapore Style Traditional Breakfast in Jiffy - Eggs and Toast

Introduction:

 
 Eggs and Toast with Kaya (Egg Jam) and Butter or with Butter and sugar has always been my childhood food.  At times, I would even have it for breakfast in a row.  Many Singaporeans like it too, judging from the success (and also number) of the many franchises of "Yat Kun Coffeeshop" and "Killiney coffeeshop", this can be found in every coffeeshop in Singapore as well.  This has almost become "National Food" for Singapore.  I guess people like it because it brings back childhood memory.  For me, I hardly patronise the coffeeshops cause I simply find the breakfast too expensive.  For a buttered slice of toast sliced in half and small cup of coffee and 2 eggs, I have to pay between $2.50 to $4.00, where I can cook for my family at a much smaller price, and anyway I like to have it at home.

 
Here I share how I prepare the breakfast, brush my teeth, all in a jiffy in approximately (15 min - 20 min) for a morning for my family of four.

 
Recipe Name:  Soft Boil Eggs and Toast with Kaya and Sugar
Serves : 3-4
Time for preparation: 15 min - 20 min

 
Steps for preparation are

  1. Fill a saucepan with sufficient water to cover the eggs and set it on a stove for boiling.  You should have significantly more water so the temperature will not fall too much.  You need the heat to cook the eggs.

  2. Take out the eggs, I usually have 2 eggs per person.  They should be fresh and at room temperature.  If they were previously in the fridge, you may want to soak them room temperature water, like what I did below, to bring them quickly to room temperature.
  To ensure that my family do not get to exposed to homones or antibiotics.  I tend to choose eggs which chickens have not been fed on homones and antibiotics.  In Singapore, I usually buy eggs from Fairprice NTUC and I pick the Sakura Eggs.  It costs a little more at SGD$2.60 - $2.80 for a pack of eggs as compared to the regular eggs at $1.55 per pack of 10.

3.  At this juncture, while waiting for the water to boil, I will set my oven to 170 degrees Celsius and pop in the bread. I tend not to use the toaster (not because I cannot afford to use one), because I can toast the 6-8 slices of bread at one go.

4.  If possible, I will use the traditional bread which I usually get from Balestier Road when I visit my husband's grandmother, or my in-laws visit them on the weekends.  But sometimes, I will just use the ordinary sandwich loaf e.g. Gardenia High Fibre white bread.


5.  While waiting for water and toast, I pop into the bathroom to brush my teeth and cleanse my face.  When I am ready the water would be boiling and one side of the toast should be suitably browned.

6.  I will first turn the toast on the other side to brown the other side as well, before I attend to the eggs.

7.  For the eggs, there are usually a few ways to can cook it from here.
  • First Method:  If you have 4 or less than 4 eggs.  You may want to use a gadget which is a soft boil egg maker.  I have one which I bought more than 10 years ago for SGD$5 at Carrefour.  It is just a simple container with a small hole at the bottom with gradations to indicate where to pour the water till.  You place the eggs and pour in the water to the appropriate level.  It works on controlling the amount of time the eggs get soaked in the hot water.
  • Second Method:  If you have more than 4 eggs and do not own a softboil egg maker.  You can lower the eggs gently into the hot water with a spoon.  Cover the saucepan with a lid and keep it soaked for approximately 8 minutes.  If you like you yolk a little harder then 10 minutes. Note that if the weather is colder e.g. like in Sydney during winter, you need to soak for 15 minutes.  Alternatively, put the eggs in
    wide mouth thermos flask for 10 minutes.
The toasts should be nicely toasted on the other side as well and should be ready for eating. Remove from oven.  If the toast is too thick, use a bread knife to slit it in half from the middle (I like the thick toasts, cause when slit in half it is extremely thin and just crumbles when I bite into it.)

8.  Essentially the breakfast is ready.  Just crack the eggs into a bowl and add soya sauce and pepper to taste. Take the toast and butter it with butter and Kaya (coconut and egg jam), my children likes butter sprinkled with sugar.  Dip the toast into the soft-boiled eggs and enjoy your breakfast.