Amazon Promotions

Showing posts with label lunch. Show all posts

Wednesday, July 2, 2014

Shinya Shokudo : Canned Maguro Rice (Tuna Rice) - Season 2 Episode 15

Shinya Shokudo : Canned Maguro Rice (Tuna Rice) - Season 2 Episode 15

深夜食堂 2 (第15 话) - 鲔鱼 (金枪鱼)美奶滋盖饭

Maguro Rice - Inspired by the series Shinya Shokudo

When you become a mummy, the food that you cook tend to revolve around what is good for the kids and what the kids will tend to eat and it is really difficult to try new recipes when they are picky eaters.  My girl does not like sweet stuff and rejects cakes and biscuits.  My boy tends to be suspicious of new food and would like to stick to the traditional stuff.  Once in a while, you must really starve them to introduce new food.  Used to be able try new stuff during lunch and that too stopped as I now make packed lunch for my husband when I am free and that means catering to his taste as well.

Anyway I watched the Japanese series "Shinya Shokudo" last school holiday and have been meaning to try out new recipes and I finally got a chance since I was on medical leave yesterday and that meant I would stay at home and try something simple.  I did butter rice in the morning, and finally managed to try out the canned maguro don.  It is really simple and nice and taste like a modified and improved version of  the traditional tuna mayo filling that I make for my sandwiches, except, this time the filling is topped on rice. I served mine with miso soup and I really liked it.

The recipe below makes actually 3 servings....so you can make and use the left over for sandwiches later.  I refrigerated mine in an airtight container and it will be my lunch today as well.  By the way, the recipe is quite versatile, adjust according to taste.  If you like more of a spiced up version, a little more wasabi would be good.  Potentially, these could be for my kids so I reduced the wasabi.


Recipe : Canned Maguro Rice (Tuna Rice)

 Servings: 2-3 

Ingredients:
 
  •  1 can of tuna -  I used tuna chunks in water so that I can salt according to taste.  You can use brined tuna or tuna in oil.
  •  2 tbsp of mayonnaise
  • 1/2 tsp wasabi  ( You can add more if you like a little more spice.  We can't get fresh wasabi in Singapore, but if you could I think it would taste better.)

  • 1/2 tsp of miso
  • 1 small yellow onion
  • Salt to taste.
  • 1 sprig of spring onion ( also known as scallions) - You may use chives but it makes it more English I guess.
  • Cooked japanese white rice (warm)
 
Method:
1. Shred the spring onion parallel to its fibres and soak in chilled water.  It will cause the spring onion to curl up and makes it pretty for garnish.  
(In the original TV series, I think seaweed was used, but I am having my rice with wakame miso soup so I decided to substitute with spring onion.  For the Japanese, I think it is important that their food looks good - served with the correct utensils, having the right colour and I do agree it whets the appetite.)

 
2.  Dice the onions finely and set aside.
3.  Drain the canned tuna and place in a mixing bowl. Add in the mayonnaise and wasabi and mix well with a fork. 
4. Add in the chopped onion and mix well as well.  Taste and add salt if necessary. 
5. Scoop warm japanese cooked rice in a bowl.  Place some mixed maguro (tuna) and top with the prepared spring onion.
You may serve with miso soup to complete the meal.

Notes:

For mayonnaise, I tend to like to go for the Japanese mayonnaise and the brand by Ajinomoto....it's more for the ingredients....I tend to read the ingredients in detail and the one I get contains eggs, vinegar, salt and sugar - I see less weird chemical names that I don't recognise.

I also think that the rice will taste good if it has a sprinkling of toasted sesame...it gives it a more complex texture and it ups the calcium content at the same time. :)


Sunday, September 5, 2010

Stir Fried Bittergourd with Sliced Pork in Miso Paste


The Japanese, Korean and Chinese cultural holds much similiarities due to historical reasons.  So for many foodstuff found in one culture, you can almost see a similar rendition in another. 

One of the favourite condiments that my mother used to enjoy using is the salted soya beans.  However, with my occurence of breast cancer, my husband tends do frown when I use it as many of the version sold in the supermarkets contains preservatives and sodium benzoate which is said to be carcinogenic.  I have however found that the Japanese miso has a similar taste to the salted soya beans and have since replaced that in many of the dishes I used to cook with salted soya beans.

Miso is fermented soya beans that is said to contains live cultures which are supposed to be good for the digestive system and helps in detoxification.  It is also zinc, copper, potassium and lecithin which are thought not only to promote the immunity system but also aid in prevention of breast cancer, and hence my husband do not object too much of it when I use it in cooking.  But it is also to be noted that miso is salty and hence high in sodium, however one is also unlikely to use too much of it because of its saltiness.

This dish presented here is one of the renditions of the dishes my mother used to cook but with miso instead.

Recipe:

1 bittergourd.   Sliced lengthwise and then cut into smaller segments (left).  Sprinkle with a teaspoon of sugar and salt.  Mix well, and set aside for 30 min.  The sugar and salt draws out the bitter juices.  Just before cooking, squeeze the bittergrourd with hands, and rinse under the running tap to remove the sugar and salt. Drizzle with the juice from one small knob of ginger that has been grated.
1-2 stalks of chilli  (de-seeded and chopped finely)

3-4 cloves of garlic (chopped finely)

100 g of collar pork (sliced thinly).  Marinate with a little pepper and light soya sauce.

2 tsp of miso mixed in a little warm water.

sunflower oil

Method:

1.  Heat the wok, drizzle in sunflower oil, and stirfry the garlic and chilli till fragrant.

2.  Add in the sliced collar pork and fry till it is almost cooked.  Then add in the bittergourd and stir-fry well.  The wok should be relatively dry.

3.  Add in the miso paste that has be softened with a little warm water.  Off the flame and fry the mixture well.  The miso should not be overcooked as it said that it will kill the cultures in the miso.  Once, mixed well, the dish is ready for serving.

This is one of my favourite dish I like to use in my lunch bento as it is not too saucy and yet flavourful.


Sunday, July 4, 2010

Braised Pig's Trotters - the Easy Way with Slow cooker

My son insisted that I must add this to my blog so that his wife knows how to cook this....so this is how it goes.  Occasionally when I go to the wet market, or when they crave for it, I will cook it for them.  I also like this dish because it is very easy to cook using the slow cooker, you literally throw in everything and let it simmer.  So occasionally I will cook over the night for lunch.  The way that it is prepared here requires no extra oil-you will get it from the trotters itself.  It is not the traditional method, but it tastes just as good (my husband says that he can't tell the difference between this and the famous stall that we usually patronise at Ang Mo Kio, so I guess it is true.  The sauce itself can be boiled and stored overnight, and you can add in hard-boil eggs, beancurd, even chicken wings for a second meal!  If you like, you can also add in intestines - my mum used to put in pig's tongues and lungs as well - though lungs are no longer available in Singapore.

In traditional Chinese family, the sauce boiled and kept in a pot sealed with wax paper after use and kept in a cool dry place (there were no refrigeration then) to reserve for the next use.  When there is insufficient sauce, a new batch is cooked up and added to the old sauce.  So essentially, the sauce can be hundreds of years and it gets passed down generations after generations.  Flavors of the previous braised meats enhances the sauce and adds to the complexity.  So here is the recipe.

Serving Size : 4 - 6
Preparation Time (not including cooking and soaking of mushrooms) : 10 - 15 min
Cooking Time:  About 6 hours on Auto for the slow cooker.

Ingredients:

6 - 10 Dried Shitake Mushroom.  You can soak it in water in the fridge overnight / or whole day - when I know I am cooking this dish in the evening.  Or you can soak in hot boiling water for an hour to soften.  You cannot substitute with fresh shitake as it does not taste right. Wash the mushroom first before soaking so that you can reserve the water which the Japanese says it is full of "unami".   Snip off the stalks after it has soften.  You can add the stalk and liquid to the braise to enhance the flavour.  I don't usually eat the stalks.

1 -2  Whole Pig Trotter  :  I usually get this at the wet markets, but occasionally I also get it at the supermarkets.  Get the butcher to chop up into big chunks for you, it will tend to shrink after it cooks.  I don't usually use up the trotter.  I keep some of the bony parts without any meat and reserve it to make peanut or black bean soup on another occasion.  I usually use the front trotters as they have less fat, but they also have less meat.  So when I use it, I need about 2, as my family favours the lean parts more than the skin.
1 packet of Bak Kut Teh Mix.   I confess, this is the part which I cheat on.  My mother used to go to the Chinese medicinal hall to get the shop keeper to do the mix, while my mother-in-law has her own mix of star anise, cinnamon bark and cloves.  This is key that distinguishes flavor between one family to another.  For me, I need something foolproof so I use the bak kut teh mix which you can get from the supermarket. 
Note that there are two types of mix, the peppery ones and the herbal ones, stick to the herbal ones.  You can use any brand, I use Eu Yan Sang as they come in sealed packs and can be kept for a long time.  (I have a friend who always gets a few boxes at the Airport to bring abroad when she comes back to visit in Singapore. A box contains 12 pkts.)

2 -3 clusters of garlic.  You must add this if you want an authetic taste.  Don't worry, it loses its sharpness after braising.  Wash the garlic and crush them slightly with a back of a cleaver or mallet. (Leave the skin so that the garlic will not break up too much when cooking. Crushing allows the garlic flavour to infuse the braise.)
8 tbsps of Dark Soya Sauce.  Less if you like your trotters a little lighter, more if you like it darker.  I favour the dark soya sauce with red dates, as it is really thick and not so salty.  Furthermore, the red dates add sweet taste to it.  With this there is no need to fry the caramel or add sugar which some of the traditional recipes ask for. 
Water to Cover Pot.  Sea Salt about 1 teaspoon.

Procedure:

  Boil a kettle of water.  Blanch the pig's trotters in the boiling water to remove the blood on the surface, which will leave scum when you braise. Soak it in the hot water for a short while, meantime you can assemble the pot.


Layer in the softened shitake mushroom, crushed garlic and herb bag.


Put in the trotters.  Put the trotters on top of the above mixture, prevents the herb bag, the garlic and mushroom from floating around.  Drizzle in the soya sauce.  (Some people prefer to drizzle and coat the trotters with the sauce before putting in....it doesn't quite matter for me.)
Add in sufficient water (if you want it to be faster, hot water) to cover the trotters.  Put on the lid, turn the setting to "Auto" .  And braise until the trotters soften (till the meat detaches easily from the bone). Add sea salt to taste and mix well burning turning off the braise. And it is ready for serving.
Comments: 

  • You can do the same in a pot (preferably claypot), set it to a boil then a simmer till the bone detaches.

  • I do this for my lunch at work the next day, so I usually set this around 9 pm and it is ready by 5 am in the morning when I wake up. 

  • If cooking for dinner on weekends, I do this at in the morning around 11 am and it should be ready for dinner in the evening.

  • Remember to reserve the stew the next day, you can boil the mixture and add in hard-boiled eggs, beancurd, beanskin, intestines, or chicken wings for a second meal.
FREE Standard Shipping on $49+

Tuesday, June 29, 2010

Stir-fried Beansprouts with Beancurd


  I think almost every Chinese family in Singapore will have their own version for this dish. This used to be a dish we would eat almost every week (and sometimes more than once) when I was much younger as it was a cheap, nutritious and yet simple and quick dish to prepare. (My mother would get about 50 cents worth of beansprouts and a large piece of beancurd which cost about another 40 cents then, and that was sufficient to feed about 5-6 mouths)

My mother would also tell me stories of the times (before I was born) when my father was retrenched from his job, and how they would go to the wet market to ask for the left over beansprouts casings and pick out the remaining beansprouts to cook the dish. Eating this dish therefore not only brings back childhood memories but also reminds me to appreciate what I have in life and to be thankful for what I am given.

[Click on Read More to get the full pictorial recipe.]

Ingredients:
Time to Prepare including cooking time: 15 min
Serving Size : 3 - 4 people

  • 2 small cubes of beancurd or one large cube of bean curd. They are the harder variety ones, not the silken toufu. I usually try to get them from the wet markets, however, they are also sold at the local supermarkets. You may need to try out different brands, but if buying from the local supermarket (NTUC Fairprice), I prefer to use the ones by "Sheen" - the taste is closer to the ones I had when I was younger.
  • 300g of beansprouts. You don't need to be exact. Remove the shells that you can see. If you are lazy, you can buy from the supermarkets those that have both the heads and the tails removed, it costs more though about $1.00+ per pack of about 150g. I prefer to have both the heads and tails, but for today, I used the ones with the heads and tails removed as these were the fresher ones at the supermarket.)

  • 1-2 segments garlic (chopped finely)


  • Oil for Frying the beancurd. (I use sunflower oil, as the oil is light and does not impart additional smell to the beancurd.)


  • SeaSalt and Light Soya Sauce to taste.
Procedure:
Step 1:  Heat the wok over high flame.  Add in some sunflower oil.  The oil should cover the base of the work about 1/2 inch thick and then lower the flame to medium heat.  Don't really worry about the amount of oil used here, this is used for frying the beancurd and we will drain the oil and use a lot less on the final dish. 


Step 2:  While the oil is heating up, take the time to cut the beancurd into bite size.  (Approx. 1/2 inch wide and 1 inch long...again you don't need to be exact.)  To prevent the beancurd from sticking to the wok during frying, you may want to dry the sides with a kitchen towel first.


Step 3:  You need to wait for the oil to be sufficiently hot before you add in the beancurd.  It is hot enough when the oil looks as if it is is about to smoke, there is small streams of what looks like steam but not really smoking yet.  Lift the wok and swirl the oil around to coat the side.  This not only prevents the oil from smoking but the coating at the sides prevents the beancurd from sticking to the sides of the wok.

Do not throw in the beancurd, cause the oil will splatter!.  If the sides of the wok is coated with oil, you will find it relatively easy to slide the beancurd in piece by piece from the side of the wok.  Alternatively, you can release the beancurd piece by piece into the oil using tongs or chopsticks, remember, the closer you release to the oil, the less splattering there will be.

Note :  Do not turn over the beancurd at this point of time, wait for the bottom to crisp up.  You will be able see when it does from the side of the beancurd when it starts turning slight golden in colour.


 Step 4:  While waiting for the beancurd to crisp on one side, you may want to wash your beansprouts.  I put mine in a strainer and run it over running water, while tossing the beansprout and sloshing it around. 


Step 5: Turn the the beancurd over when the bottom is slightly golden brown and fry till the beancurd is evenly golden.  You can use a spatula or a chopstick to do the turning.  The ready beancurd should be crisp on the outside and still soft on the inside.

Once ready, remove them, using the spatula from the oil and place them on tempura paper or on a sieve to absorb the excess oil. Set aside for later use.


Step 6: Remove the oil from the wok till only a little is left, sufficient for stir frying of the garlic. (It should really be only sufficient to just coat the garlic.) Lightly fry the chopped garlic till fragrant and the sides of the pieces starts to brown.


Step 7: Add in the washed beansprouts and with the spatula, mix garlic into the beansprout.  Sprinkle in the seasalt (approx. 1/2 tsp) and drizzle a little light soya sauce (approx. 1/2 tsp).  Mix well.

Please do not add in too much light soya, else the beansprouts will brown too much. 
Step 8: Add in beancurd and mix well. You may want to add
Please do not overfry, just mix in the beancurd. The beansprouts taste best when it retains its crisp without tasting too raw. (Btw, beansprouts can be eaten raw.)
Step 9: The dish is now ready, so just remove it from the wok and set it on a plate for serving.
Comments:
  • Variations:  There are many variations to this dish.  Some people like to add in shredded chicken, or small pieces of salted fish that has be prefried.  My mother-in-law adds in chilli slices and sliced shitake mushroom.  I have a friend who tells me his favourite dish is when the beansprouts are stir-fried with strips of pickled vegetables (mustard greens).  I guess everyone has our own experiences with this dish and hence has their own personal preferences.
  • This dish goes particularly well with rice and Teochew porridge.
  • Using a wok for deep frying at home:  The wok is a very versatile too, and can be used for frying fish, beancurd etc.  The trick is to prevent sticking, is to ensure the wok is well heated through, add in the oil for heating only when the wok is well heated (so that the oil does not overheat and smoking when the whole wok is heating up).  Swirl the heated oil to coat the side before adding in the wok and ensure that you have remove any excess moisture from whatever you are adding into the work.
  • "What if I don't own a wok?"  Don't worry so much....you can still deep-fry the beancurd in a frying pan, or deep-fryer, and stir fry the rest of the recipe in a frying pan.  I tend to favour the wok as it is very versatile and can do the whole dish up using just the wok....I don't like to wash too many utensils at the end.

Monday, June 28, 2010

How to Cook Traditional Sweet Potato Teochew Porridge


  My son is down with flu.  At times like these, he has very little appetite and would only want something simple and not too oily for him to stomach.  So he decided he wanted to have some Teochew porridge.

  Teochew porridge is a simple dish which you can have a variety of side dishes to accompany.  This is a relatively simple dish to cook and is one of my staples for lunch when I was younger.  It is such a staple for many in the older generation that my father-in-law still has it for breakfast every morning with a lightly steamed fish or some pickled vegetables.

  Teochew porridge is different from the Cantonese congee, as the grain are still suppose to be very distinctive when cooked. When I was younger, I would simply have it with a little bit of light soya sauce (shoyu), a small piece of fermented beancurd or when times allowed a small piece of fried salted fish...and that to me is bliss....it always warms my heart after having a bowl of the porridge. 
 
This porridge can be found at most stalls at the hawkers or coffee shops in Singapore selling economical rice, though theirs do not come with sweet potatoes.  For shops that specialise in Teochew porridge, the price is always quite expensive, coming up to about $10++ for a meal for two with only about 3 side dishes, so I usually do not patronise those stalls as I find that I can easily whip up a meal on my own.

Traditional Sweet Potato Teochew Porridge

Serving : 2 - 3 people
Preparation time : 20 min (for brown rice it may take an additional 10 min)

Ingredients :
  • 1 cup of long-grained jasmine white rice ( you can use brown rice here as well, the cooking time is only a little longer)
  • water
  • 1 -2 sweet potato (depending on how much you can finish)
Procedure:

 Step 1  
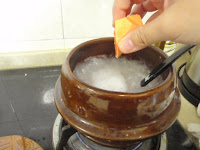
Put the rice into a pot of sufficient size.  The pot should be sufficient large so that that uncooked rice only takes up about 1/3 the size of the pot.  I like to use claypot here,  as I find the flavour of the sweet potatoes can infuse into the porridge better.  But you can use any pot of sufficient size.


Step 2  
Wash the rice about 2 to 3 times, to remove any impurities from the rice.  The water should still be murky (like milk diluted many times) when the rice is washed.


 Step 3                                                                                       Add water till the pot is approximately 2/3 full.  Do not fill to the brim else the water will bubble over when boiled.


Step 4
Put the pot over a stove over a large flame.  Cover with a lid leaving a small gap and let it boil, you will need to stir once or twice during the boiling to losen any grains that may get stucked at the bottom, else those grains will char.


Step 5
Peel the sweet potato(es) with a potato peeler and but into bite size.  Note that the size will get smaller the sides will break off and infuse in the porridge when cooked.  You can use any variety of sweet potato here.  My favourites are the orange-fleshed ones (usually from Australia) and the Japanese sweet potatoes.  If you can get organic ones, You can just scrub the sweet potatoes and cook it with the skin on and eat it.  It is suppose to be more nutritious.


Step 6

I soak the sweet potatoes in water while waiting for the porridge to boil so that they do not discolour.


Step 7

When the porridge boils, you will need to remove the lid.


Step 8

Add in the sweet potato at this junction.  And wait for the mixture to boil again.  When it boils, lower the flame till the mixture just boils but not over the pot.


Step 9

Continue cooking till the grains are cooked through, (that happens when the grain is of uniform colouration) and the grains start to fluff and split.  (In Chinese, we say that the grains just "opened").   Off the flame at this junction.


 Step 10

Put back the lid, and let the grains cotinue to cook in its own heat while you prepare the side dishes.

When you are ready, you can serve the porridge with its side dishes.


Dishes that can goes well with Teochew Porridge:

  • Fried Luncheon Meat Cubes (my kids favourite, though not entirely healthy, but I occasionally indulge them.

  • Sliced Steamed Squid with Orange Sauce Dip

  • Pickled Vegetables


  • Onion Omelette